Introduction
For as long as content-centric websites have been around, the need for searching the content has been there. Many of the most successful dot-com businesses have been search sites such as Yahoo! and Google. Every few months, a new search site opens its doors, many of which perform aggregate searches of multiple sites simultaneously. At the other end of the spectrum, many site owners require a search capability that returns only results for their specific site.
Microsoft Content Management Server (MCMS), while a very robust content management solution, does not offer any search capabilities out of the box. However, just because you have an MCMS website doesn't mean you are stuck without search capabilities.
MCMS Search Options
There are quite a few ways to implement searching on an MCMS website, each with varying costs, implementation complexity, and limitations. As usual, each option has its advantages and disadvantages. Google provides a Web Service API for you to submit queries against at no cost, but you are limited to 1,000 searches per day, and there are some licensing requirements regarding logo placement. Coveo provides a free, no-expiration license for its Enterprise Search product, but it's limited to searching 5,000 documents (searching more than 5,000 requires a license to be purchased from Coveo). Mondosoft's MondoSearch seamlessly integrates into MCMS and offers us a robust feature set, but it's not free.
Microsoft's enterprise portal solution, SharePoint Portal Server 2003 (SPS), contains a powerful and customizable search engine. The indexes SPS creates are accessible for searches by submitting a Microsoft SQL Full-Text query via a Web Service. If your organization has already implemented, or has plans to deploy SPS, then you could leverage it as your MCMS search engine. Do be aware, however, that if your site is publicly accessible, this solution may not be as compelling, as a SharePoint External Connector license would be required. For this reason, the SharePoint search solution we look at is typically only a viable option for intranet-based MCMS sites.
In this chapter, we will leverage SPS's search to provide a robust search capability for our Tropical Green MCMS site. On the way, we'll configure SharePoint to index our Tropical Green site. We will also try out some free components you can use in your MCMS site to execute search queries against the SharePoint index.
Microsoft SharePoint Portal Server Search
To fully leverage the SharePoint Portal Server Search to your advantage, you need to understand how it works and how to configure it. Before we explain how it works, there are a few key components that need to be understood:
- A content source contains the information that will be indexed. Content sources can be external websites, file shares, Windows SharePoint Services sites, Microsoft Exchange public folders, or other systems that provide a protocol handler for SharePoint Search such as Lotus Notes.
- Index files contain crawled content from one or more content sources. Aggregating and cataloging content from disparate content sources enables future search queries to be much more efficient. Index files can also be copied or propagated to SharePoint Web servers for more efficient searching. Two indexes are created by default when you create a new portal:
Portal_Content and Non_Portal_Content. As expected, the former contains all content stored in the portal while the latter contains content outside of the portal. - Search scopes are used to provide a logical grouping of content sources for end users to search. For example, a company may have multiple internal file shares and websites. An employee looking for a specific document doesn't care if it's in site A or file share B, they just know it's out there. An administrator can create multiple content sources and group them together in a single search scope that the user can search against. In addition, search scopes can be configured to only include specific portions of a website, providing even more granular control over what content is indexed and searchable by your users.
- The SharePoint gatherer is responsible for crawling all content sources, extracting content, removing noise words (such as 'and', 'a', 'the', 'or' to name only a few… noise word files are customizable so you can add your own noise words), and creating index files that will be used when search queries are executed.
The gatherer is part of the MSSearch service that performs the content crawling and creates the index files. This service runs on schedules that you can configure through the SharePoint Central Administration tool. The MSSearch service activates the gatherer, based on the specified scheduled timetable, which generates a master index for search queries.
An end user uses a search scope to select a collection of content sources to query. SharePoint looks at the catalog containing the content sources and determines the best candidates that match the search query.
Preparing the MCMS Site for Indexing
Before we can configure SharePoint to index our MCMS site, there are a few steps we need to take to make the indexing more efficient and useful. First and foremost, check if your site has the MCMS option Map Channel Names to Host Header Names set. If so, you'll need to disable it because one of the two options we have, utilizing the MCMS Connector, does not support host header names. For the rest of this chapter, we will assume our site exists in the top-level channel TropicalGreen.
| If your site uses the Map Channel Names to Host Header Names option, you may need to rename the top level channel to reflect the channel we'll use in this example (namely TropicalGreen). |
In addition, our example assumes you've set up MCMS and SharePoint according to Appendix A, Setting up MCMS & SPS on the Same Virtual Server. If your MCMS Web Entry Point and SharePoint portal are not in the same virtual server, this requirement may not affect you.
Second, we'll configure our site for guest access. The majority of our Tropical Green site is intended to be available to any anonymous visitor. While we do have one restricted section of our site, we will set up a new account that will have read access to our entire site for use by SharePoint as it crawls our site. Then we'll filter the results to ensure that the user running the search will only see items in the search results he or she has access to.
Next, we need to address how MCMS and output caching behave on requests for postings. The default page rendering behavior of MCMS is not performance-friendly to SPS searching. Because all MCMS requests return an HTTP status code of 200, SharePoint will always perform full crawls of our site and not an incremental crawl. We have already explained the details of what happens with each index crawl request and implemented a solution in Chapter 4, Preparing Postings for Search Indexing.
Finally, we'll add a control, supplied with the MCMS Connector for SharePoint Technologies, to our templates that makes additional metadata properties available to the index crawler, giving additional information for users searching our site.
Disabling Channel Names to Host Header Names Mapping
One of the examples we'll run through in this chapter involves using the MCMS Connector for SharePoint Technologies. The search controls shipped with MCMS Connector do not support the host header mapping feature and therefore, we cannot enable mapping the channel names to the host header names. If your site employs this option, you'll need to disable it. In addition, we should rename the top level channel www.tropicalgreen.net to TropicalGreen which is much more convenient as this will now become part of the path in the URL.
| The MCMS Connector for SharePoint Technologies requires the .NET Framework 1.1. It will not function properly on a site running version 1.0 of the .NET Framework. |
This change may cause some User Controls in our site to throw errors as they reference a channel path that no longer exists. Check the following files to make sure any references to /Channels/www.tropicalgreen.net/ are changed to /Channels/TropicalGreen/:
- /Login.aspx
- /UserControls/RightMenu.aspx
- /UserControls/SiteMapTree.aspx
- /UserControls/TopMenu.aspx
You'll probably want to add an additional file in the root of our website that automatically redirects users to our site's channel. Call the file default.aspx, and it should contain the following line:
<% Response.Redirect("/TropicalGreen/")%>Any requests for http://www.tropicalgreen.net will now be redirected to http://www.tropicalgreen.net/TropicalGreen/.
| If your solution requires the Map Channel Names to Host Header Names feature, the MCMS Connector search solution will not be appropriate for your needs. You can, however, build your own custom search solution as described in detail later in this chapter. |
Assigning a Search Account
Our Tropical Green site has both a public section of the site and a members-only section. If an anonymous user, or guest, executes a search, they should only see results from the public portion of the site. However, if an authenticated user executes a search query, they should see appropriate results from both the public and private portions of the site.
In order for SharePoint to index our entire site, including the members-only section, we need to create a new account that will have access to the entire site. We'll then configure SharePoint to use this account when indexing. Let's assume we have an account already created called MCMSBOOK\SearchCrawler. The first thing we need to do is configure SharePoint Portal Server to use this account when crawling content.
- Start the SharePoint Central Administration by pointing to Start | All Programs | SharePoint Portal Server | SharePoint Central Administration.
- Under the section Server Configuration, click the Configure Server Farm Account Settings link.
- Enter the search crawler account credentials in the Default Content Access Account section and click OK.

Now we need to grant our SearchCrawler account subscriber rights to the entire Tropical Green website.
| We're going to assume you have already installed the MCMS Connector for SharePoint Technologies as its installer creates an MCMS Search subscriber group in Site Manager for use in searching your MCMS channel structure. Refer to Appendix B for assistance in installing the MCMS Connector. |
- Start Site Manager by pointing to Start | All Programs | Microsoft Content Management Server | Site Manager.
- Select the User Roles button on the left panel within Site Manager.
- Select the Subscribers user role.
- Then right-click the MCMS Search User Subscribers role and select Properties.
- Click the Group Rights tab to view all the channels, templates, and resources the MCMS Search User role has rights to. All channels, templates, and resources should be checked.
- Click the Group Members tab and click the Modify button.
- Enter the MCMSBOOK\SearchCrawler user that we added above as the SharePoint crawl account, and click OK.
- Click OK again to close the property window.
We have now configured SharePoint to crawl our site using the dedicated account and granted the account access to all content within the Tropical Green site.
Enable Guest Access for Tropical Green
Because our site will be publicly available, we need to make sure that it's not going to require visitors to log in. To configure our Tropical Green site to allow guests to view it, we need to enable guest access. If you would like full details of how this is done, full instructions are given in the first book, Building Websites with Microsoft Content Management Server (Packt Publishing, January 2005, ISBN 1-904811-16-7). See the section Welcoming Guests to the Site in Chapter 18.
| If you have already configured your site for guest access, you can skip this step. |
In order to allow guests into our site, we need to:
- Create a new MCMS Guest Account in the domain or as a local user on the server.
- Using the SCA, configure MCMS to allow guests and to use the account created in step 1 as the Guest Login Account.
- Now that MCMS is configured to allow guests into the site, add the account created in step 1 to a subscribers' rights group and grant the rights group access to all channels, resource galleries, and template galleries that currently exist in the site, except for the Members channel located in the Gardens channel.
| We've chosen to enable guest access to the site for simplicity. However, it is possible for SharePoint to index our site using Forms or Windows Authentication. For Forms Authentication, we would need to create a special home page that automatically logs the user in with a predefined account to gain access to the site so that SharePoint could start its crawl. We would have to grant the SharePoint crawler account permission to the appropriate subscriber rights group. |
If you chose to create an alternate home page to automatically log SharePoint into your site, keep in mind that any user could use this page to gain access to your site. Special care should be taken if you use this method, such as adding IP restriction to this page so that only the SharePoint server can access it.
Output Caching and Last-Modified Dates of Postings
ASP.NET is not particularly sophisticated when it comes to generating HTTP status codes, simply returning an HTTP code of 200 (OK) for every request rather than sending a Last-Modified HTTP header. When SharePoint Portal Server performs an incremental index crawl, it sends HTTP GET requests for every page on the site it finds. If a page has previously been indexed and it returned a Last-Modified header, SharePoint Portal Server sends a conditional HTTP GET request that includes an If-Modified-Since HTTP header with the date previously returned in the Last-Modified HTTP header. If the response is an HTTP status code 304 (not modified), SharePoint will not index the page again. However, because ASP.NET always returns status code 200, the site will never be incrementally crawled by SPS, and will effectively undergo a full index every time the gatherer is executed. As MCMS template files are actually special kinds of ASP.NET Web Forms, this also affects postings based on these template files. Refer to Chapter 4, Preparing Postings for Search Indexing, for instructions on how to address this problem.
One thing to consider is channel rendering scripts and postings that contain dynamic lists of links to other postings. While these scripts and postings may not have changed since the last index, the content generated by these scripts can change between different calls to the posting. If this content is content you wish to search for, you should ensure that postings containing such controls are always indexed by not returning a Last-Modified HTTP header.
The Connector SearchMetaTagGenerator Control
The last modification we need to do is to add a control that ships with the MCMS Connector for SharePoint Technologies. The SearchMetaTagGenerator outputs standard and/or custom page properties. In addition, we can use it to control what properties are output and even add our own custom properties. Adding the SearchMetaTagGenerator control to your templates is very easy. Let's add it to our Plant.aspx template:
- Open the Plant.aspx file in Design view.
- In the Toolbox, select the Content Management Server tab, and drag the
SearchMetaTagGenerator to the top of our template. | If you don't see the SearchMetaTagGenerator in the Toolbox and you've installed the MCMS Connector for SharePoint Technologies, right-click on the Toolbox and select Add/Remove Items. In the Customize ToolBox dialog, click Browse, navigate to the Microsoft Content Management Server\Server\bin\ directory, and select the Microsoft.ContentManagement.SharePoint.WebControls.dll assembly. Finally, click OK in the Customize ToolBox dialog. You should now see the additional controls in your Toolbox. |
If you haven't installed the MCMS Connector for SharePoint Technologies, refer to Appendix B, MCMS Connector for SharePoint Technologies, for download and installation information.
- Click the
SearchMetaTagGenerator control we just added, and in the property window, select one of the following PropertyTypes: CustomProperties: Generates META tags for custom page properties. StandardProperties: Generates META tags for standard page properties (such as DisplayName, DisplayPath). CustomAndStandardProperties: Generates META tags for both custom and standard page properties (default). PropertiesFromXMLFile: Generates META tags for the properties specified in the SearchPropertyCollection.xml file. More on this in just a moment.
- For now, let's chose the
CustomAndStandardProperties property type. 
- Because the Visual Studio .NET designer won't allow us to drop controls into the
<head></head> portion of the page, we need to move the code declaration of the SearchMetaTagGenerator control from the body of the page to the heading. Switch to HTML view, find the SearchMetaTagGenerator control we just added, and move it up between the <head> and </head> tags. - As with any changes, we should now rebuild the Tropical Green project.
- Open a browser, and navigate through the site to a plant posting in the plant catalog section of the site. Take a moment to view the source of the posting you navigate to. Notice all the extra META tags that have been added. Here's an example:

| Notice the FIRSTSAVEDBY property listed at the top of the META tags. This is a custom property that has been added to the posting. It is added to the META tags because we selected the CustomAndStandardProperties property type in the SearchMetaTagGenerator control. The other META tags are the standard properties generated by the SearchMetaTagGenerator control. |
When rendered, any posting implemented with the Plant template will contain META tags in the <HEAD> portion of the page for each of the page's custom properties and standard properties.
One of the items available to us in the PropertyType field is PropertiesFromXMLFile. This option allows us to specify exactly which properties will be exported as META tags using an XML file located at Microsoft Content Management Server\Server\IIS_CMS\WssIntegration\SearchPropertyCollection.xml.
Once you have specified which properties you want to use, including custom properties you've added, you need to tell SharePoint to index these properties in the crawl. The console application SearchPropertiesSetup.exe included with the MCMS Connector will tell SharePoint about the updated XML file. Run it using the following syntax:
SearchPropertiesSetup.exe –file "\SearchPropertyCollection.xml"
| The SearchPropertiesSetup.exe utility can be found in the following location: :\Program Files\MCMS 2002 Connector for SharePoint Technologies\WSS\bin\. |
Go ahead and execute the SearchPropertiesSetup.exe utility as above because our custom search solution will use one of the META tags it generates.
| If you change the SearchPropertyCollection.xml file, you will need to re-execute the SearchPropertiesSetup.exe utility. |
The MCMS Connector for SharePoint Technologies includes a help file with instructions on how to modify the XML file. Be aware that a Microsoft Support Knowledge Base article exists addressing an error in the help file instructions. The MSKB article: "A problem occurs when you add the SearchMetaTagGenerator control to a template in Content Management Server 2002 Connector for SharePoint Technologies" (#872932) contains corrected instructions.
Our Tropical Green site is now configured to allow guests to visit the site, our templates have been modified to be more SPS search friendly, and we have included additional metadata in the <HEAD> section of all our rendered postings. Let's proceed to create a content source in SharePoint to index our site.
Configuring SharePoint Portal Server Search
With our MCMS site ready for indexing, we now turn to SPS. First, we will configure SharePoint to index our Tropical Green site. After creating the index, we'll create a source group that will contain the content source. Source groups are used to group content sources together in a logical collection. In our case, we'll have a single content source in our source group. The source group is what we'll reference when we create our search logic in the Tropical Green site.
| The next few steps assume you've created a portal in SPS. Refer to Appendix A, Setting up MCMS and SPS on the Same Virtual Server, for instructions on how to create a portal. While Appendix A details how to configure a virtual server to host an MCMS site and SharePoint portal at the same time, we do not want to do that for this chapter. We need two virtual servers, one for the www.tropicalgreen.net MCMS site and the other for the SharePoint portal.tropicalgreen.net site. Appendix A details how to create a new virtual server and a new SharePoint Portal Server portal. |
Creating a New Content Source
The first step in configuring an SPS search is to create a content source. One way to accomplish this is to use the SearchSetup.exe command-line tool included with the MCMS Connector. This utility can be found in the MCMS 2002 Connector for SharePoint Technologies\WSS\bin folder. The SearchSetup.exe utility creates the necessary content sources in SharePoint as well as all the site rules to include the root channel and all top-level channels in your site hierarchy in order to include and exclude the appropriate content. For more information on the SearchSetup.exe utility, refer to the help included with the MCMS Connector.
| In order to use the MCMS Connector search controls SearchInputControl and SearchResultControl, you need to use the SearchSetup.exe utility to create your content source and source group in your SharePoint portal. This is because the MCMS Connector search controls are hard-coded to look for a specific SharePoint search group named "CMSChannels". To complete the two search examples in this chapter, create two sets of content sources by following the steps in this section using the SearchSetup.exe utility and by creating the content source manually. |
Creating a Content Source with the MCMS Connector Utility
Let's use the MCMS Connector SearchSetup.exe command-line utility to create a new content source and source group:
- Open a command prompt and change the current directory to the following MCMS Connector default utility directory:
cd "C:\Program Files\MCMS Connector for SharePoint Technologies\WSS\Bin"
- Enter the following command to create a new content source that will index our Tropical Green website, using the MCMS guest account to crawl the content, and initiate the crawl immediately after creating the content source (replacing the user and password credentials with your MCMS guest account credentials):
searchsetup.exe -url "http://www.tropicalgreen.net/TropicalGreen/"
The table below describes each of the possible switches:
| Switch | Description |
| url
| The MCMS URL that will be used by SharePoint as the start point of the crawl. |
| crawl
| Indicates whether or not a crawl is performed immediately after SharePoint creates the content source. A value of "1" instructs SharePoint to perform a crawl immediately. Otherwise, set it to a value of "0" to stop SharePoint from crawling the site. |
| user
| The user account that has access to the MCMS content to be indexed. |
| password
| Password of the user account. |
| portalurl
| URL of the SharePoint portal server that will contain the content source. |
| You only have to run this command-line program once, not every time you update the site. If you need to perform a full crawl of the site again, you can do so by resetting the content source and executing a full crawl. Refer to the SharePoint Portal Server documentation for more information on this. |
Now that we have a new content source created, let's create a new search scope to make it easier to test our search results.
Creating a New Search Scope
While SharePoint is indexing our site, we should go ahead and create a search scope.
- Open the General Content Settings and Indexing Status page by browsing to your portal and clicking the Site Settings link in the upper right. Under the Search Settings and Indexed Content section, click the Configure search and indexing link. Then click the Manage search scopes link.
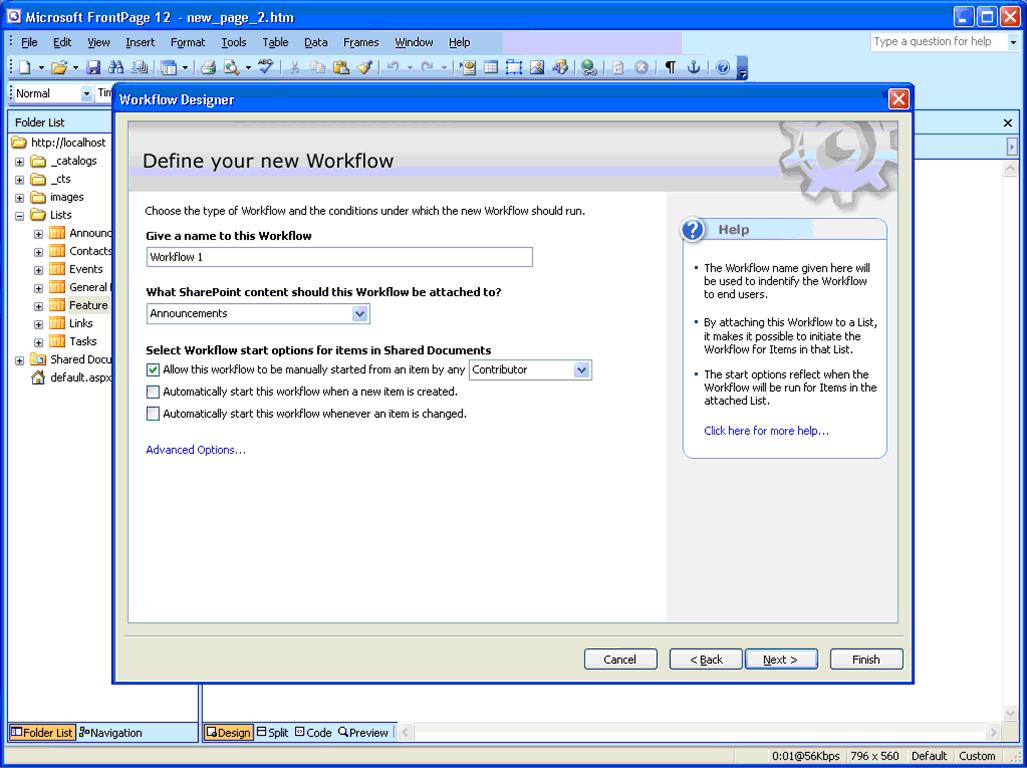
- On the Manage Search Scopes page, click the New Search Scope button. When prompted to create a new search scope, enter the following:

- After clicking OK, SharePoint will take us back to the Manage Search Scopes page with our new scope.
- Let's get back to the search configuration page. Click the Site Settings link in the heading of the Manage Search Scopes page. Then click the Configure search and indexing link under the Search Settings and Indexed Content section.
- At this point, we should make sure everything is configured correctly. We've created a content source and added that source to a new site group. By now, SharePoint should have finished indexing our site (unless you added hundreds of postings to it). Look at the Non-portal content column. If you see errors, warnings, or zero documents indexed, examine the log—some errors might not be errors at all, others may indicate errors within the MCMS site itself.

| One common error, The address could not be found, is usually caused by links to empty channels that are not configured to use channel rendering scripts. Since we'd expect guests to receive this error when browsing the site, it's not surprising the SharePoint gatherer ran into the same problem. This is not a problem with the SharePoint index, but rather with the structure or of our site: channels that could be empty should have channel rendering scripts or be hidden from the navigation. |
- If there are no problems, we can test our index. Click the Home link in the portal navigation to get to the homepage. In the upper-right corner, select TropicalGreen.net (SearchSetup.exe) in the dropdown (the whole name may not appear due to design constraints on the width of the dropdown), enter ficus in the search box, and click the green arrow to execute the search. The search results should find the posting in the plant catalog.

| Your search results may not match what is indicated in the image above as your postings may have been modified recently. |
We now have a SharePoint search scope created and indexing our Tropical Green site. While this search scope can be used within the portal to search our site, we will use it via the SPS Query Service Web Service from our MCMS site to provide search functionality to our users.
Creating a Content Source Manually
Another option is to manually create the content source in SharePoint rather than allowing the SearchSetup.exe utility to create it for us. We'll walk you though these steps so you will have an understanding of what's involved in creating a content source and source group in a SharePoint portal.
| Although we're explaining how to create a content source both with the SearchSetup.exe utility and manually using the same content source names, you must choose only one method as it is not possible to create two content sources with the same name. |
Let's start by creating an index of our Tropical Green website in our SharePoint portal:
| Refer to Appendix A for a walkthrough of the steps in creating a portal. |
- Start the SharePoint Central Administration by pointing to Start | All Programs | SharePoint Portal Server | SharePoint Central Administration.
- Click List and manage portal site under the Portal Site and Virtual Server Configuration section.
- The Manage Portal Sites page contains a list of all portals in the SharePoint farm. Drag your mouse cursor over the right-hand side of the list and click the drop-down arrow that appears when the mouse cursor is over a portal, and select Manage Portal Site Properties (as seen in the image below):

- Under the section Search Settings and Indexed Content, click the Configure search and indexing link.
| The following instructions assume you have not enabled SharePoint's advanced search administration mode. The main difference between the basic and the advanced mode is the advanced mode allows you to work directly with content indexes. Basic mode creates content indexes when you creating a content source. In our example, the basic mode is adequate for our needs. |
Now we will create the content source.
- Under the General Content Settings and Indexing Status section, click the link Add content source.
- On the Add Content Source page, select Web page or Web site and click Next.

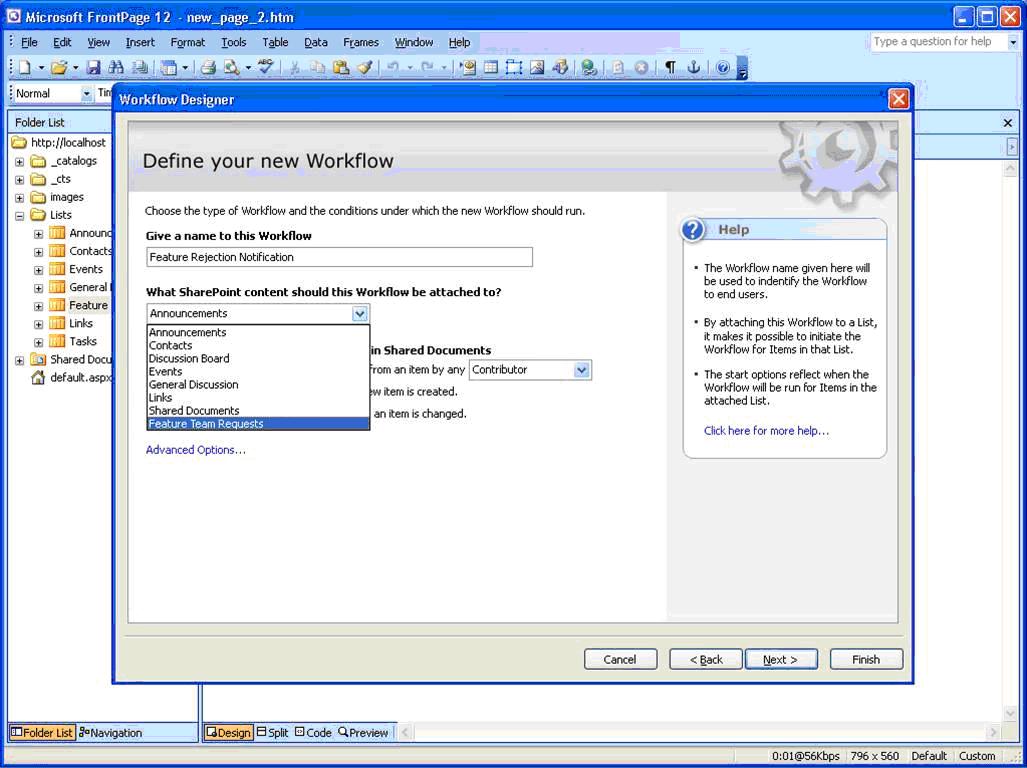
- After selecting that you want to create an external website index, enter the following information on the Add Content Source: Web page or Web site page. Once you have filled out the form, click Finish.
| If you intend to use the manually-created content source with the MCMS Connector controls, you need to name the content source "CMSChannels" as this name is hard‑coded in the connector controls. In this example, the virtual server acting as an MCMS Web Entry Point for our Tropical Green website handles requests for http://www.tropicalgreen.net/. The example will still work if you have set up the Tropical Green website on http://localhost/; you'll just need to make the appropriate changes in the steps to point to the correct domain. |

- Once you click Finish in the previous step, SharePoint will create the content source and present you with a confirmation page. At the bottom of the Created Web page or Web site Content Source, in the Start Update section, check the Start full update option and click OK. This will trigger the gatherer to start building an index of the Tropical Green website.
Once you have created a content source manually, follow the instructions under the section Creating a New Search Scope above to create a new source group using the settings in the following table:
Search Rights for the MCMS Application Pool Account
SharePoint portals typically do not allow anonymous users to access the site, and users must log in. The SearchResultControl included with the MCMS Connector, which we'll use in a moment, uses the account of the application pool identity that contains the MCMS site from which a search query is triggered to access the SharePoint search service.
- Browse to the portal we created earlier by opening Internet Explorer and navigating to http://portal.tropicalgreen.net. Then, click Site Settings in the upper right corner.
- Under the General Settings section, select Manage security and additional settings.
- On the Manage Site Groups page, click Add a Site Group. When prompted to enter information about the new group, enter the following values:
| When you select Search – Search the portal site and all related content, SharePoint automatically checks the View Pages – View pages in an area option. Uncheck the View Pages option after you check the Search option. |
- On the Manage Site Groups page, click Search Only, the name of our new group.
- On the Members of "Search Only" page, click Add Members. Add the account that's configured as the identity of the application pool your MCMS site runs under. Once you've selected the account, click OK.
| To find the identity of the application pool your MCMS site runs under, open Internet Information Services. Expand the nodes for local computer | Application Pools. Look for the application pool that your MCMS site is configured to use and view its properties. The identity is listed under the Identity tab. |
- After selecting the account, on the Add User page, ensure that Search Only under the Step 2: Choose Site Groups section is checked, and click OK.
- On the last page, where SharePoint asks you to confirm the details of the account you're adding, make sure the Send the following e-mail to let these users know they have been added option is unchecked, and click Finish.
Our MCMS site now has the permissions needed to log in to our portal and execute a search.
Adding a Search Page to the MCMS Site
We have two options available to implement a search capability for our Tropical Green site:
- Leverage the ASP.NET Server Controls included in the MCMS Connector for SharePoint Technologies that allow search queries to be executed.
- Create our own solution.
The MCMS Connector includes the following three controls that assist you in implementing search functionality for an MCMS site by leveraging SharePoint search scopes:
SearchInputControl: Used to create the search form input for a search to be submitted. SearchResultControl: Takes search criteria entered in the SearchInputControl, executes the search against the SPS search Web Service, and displays the results in list form. SearchMetaTagGenerator: Creates HTML META tags based on the PropertyType setting. META tags generated can include standard page properties as well as custom properties.
You can use these three controls on the same page or separate pages. This is very convenient as you may wish to include a small search keyword input box on all pages in your site that submits the search to a separate results page, but you might want to provide the search input on the search results page as well.
Once we have created a working search page using the MCMS Connector controls, we'll create a custom solution that won't include anything provided in the MCMS Connector. Our solution will include an advanced search, specific to our site, and a customized search result listing.
Both options have distinct advantages and disadvantages. Which one you'll implement on your MCMS site will depend entirely upon your requirements, customization needs, and available development time. The following table outlines a few of the more prominent advantages and disadvantages of using the MCMS Connector controls as well as rolling your own solution:
Implementing search leveraging MCMS Connector controls:
Implementing search with a custom solution:
Searching with the MCMS SharePoint Connector
The first thing we'll do for this is to create a new search page in our Tropical Green project. This page will not be a new MCMS template, but a regular ASP.NET page. You could make this a template, but there's no real advantage in doing so because there will only be a single search page on our site with no extra content.
- In Visual Studio .NET, right-click on the Tropical Green project and select Add Web Form.
- Name the new ASPX page Search.aspx, and click Open.
- If the page doesn't load in Design mode, click Design in the lower left corner.
- Change the page layout to FlowLayout.
- Drag the /Styles/styles.css, /UserControls/TopMenu.ascx, and /UserControls/RightMenu.ascx files from the Solution Explorer onto the designer.
- Switch to HTML mode and modify the body tag as follows:
<body topmargin="0" leftmargin="0" rightmargin="0">
- Add the following code between the
<form> and </form> tags, replacing the two user controls that were just added:  Collapse
<form id="Form1" method="post" runat="server">

<table width="100%" border="0" cellspacing="0" cellpadding="0">

<tr>

  <td width="100%" colspan="2" valign="top" bgcolor="#ffcc00">

    <img src="/tropicalgreen/images/Logo.gif">

  </td>

  <td vAlign="top" rowSpan="10"> </td>

</tr>

<tr bgColor="#66cc33">

  <td colSpan="2"><uc1:TopMenu id="TopMenu1"

          runat="server"></uc1:TopMenu></td>

</tr>

<tr>

  <td vAlign="top" style="PADDING-RIGHT:30px; PADDING-LEFT:30px;

                          PADDING-BOTTOM:30px;">

    <p> </p>

    <table cellspacing="0" cellpadding="10" border="1"

           bordercolor="#669900">

      <tr vAlign="top">

        <td>Tropical Green Search:</td>

      </tr>

      <tr>

        <td  XE "MCMS search:MCMS connector" vAlign="top">

        </td>

      </tr>

    </table>

  </td>

  <td class="RightMenuBar" width="20%" valign="top" height="100%"

      align="center" rowspan="2" bgcolor="#669900">

    <uc1:RightMenu id="RightMenu1" runat="server"></uc1:RightMenu>

  </td>

</tr>

</table>

</form>
| Why did we drag the user controls onto the page and then replace the resulting HTML? Dragging the user controls onto the page adds the <%@ Register %> lines to the ASPX for us as well as adds the user control ASP.NET tags to the HTML. We then only need to modify the HTML to make it more presentable. |
You should now have a page that looks like the following when viewed in Design mode:

Let's save our new search page, build the Tropical Green project, and navigate to it in a browser to make sure everything is in order before we go about adding the search input and results controls.
- Save all changes to the search.aspx page.
- Right-click the TropicalGreen project and select Build.
- If there are no errors in the build, open a browser and navigate to: http://www.tropicalgreen.net/TropicalGreen/Search.aspx.
- If there are any issues, retrace the steps we've taken to this point, address the errors, and retry the URL.
Now that we have a working search page, we need to add some functionality to it. We'll add the two MCMS Connector server controls, make some configuration changes, build the solution, and test our search page.
- Open the search.aspx page in Visual Studio .NET if it's not already open, and switch to Design view.
- Open the Visual Studio .NET Toolbox and drag the
SearchInputControl and SearchResultsControl into the table cell below the Tropical Green Search cell. Refer to the following image for placement: 
- Select the
SearchInputControl we added to search.aspx and set the following properties in the Visual Studio .NET property window: - Select the
SearchResultControl we added to the search.aspx page and set the following properties using the Visual Studio .NET property window:
| We're using the URL of the portal created in Appendix A. Replace this URL with whatever portal you configured for the content source and search group in the steps already covered in this chapter. |
Let's see if our search is working. Save all changes to search.aspx, build the Tropical Green project, and go to http://www.tropicalgreen.net/TropicalGreen/Search.aspx in a browser. You should see a page similar to the one below:

Enter a word you know will be found on the site, such as ficus. You will see the same list of search results that were returned when searching for the same string in the portal containing the content index.

| If you receive an error message stating "There was a problem loading the input control. The error returned by the system is: Could not find part of the path c:\inetpub\wwwroot\tropicalgreen\cms\wssintegration\searchpropertycollection.xml", double-check that you added the CMS virtual directory in your TropicalGreen web application. |
At this point, we have got search capabilities on our site, thanks to the MCMS Connector controls and SPS's search features. But this solution is very limited; for instance, there is no way to change the look and feel of these controls and there is also no way to configure which properties are displayed in the result page, for instance, to show a short description for the returned documents.
To address this, we will now build our own search controls.
Building a Custom Search Implementation
As outlined previously, there are advantages and disadvantages to the MCMS Connector search controls. The most obvious is the fact that the SearchResultControl does not allow us to configure the results returned by the SPS search. We will now build our own search implementation that will leverage the SPS search Web Service, offer advanced and specialized searching to our users, and present the results in a customizable manner.
About the SharePoint Portal Server Query Service
Everything we are about to build depends upon the Query Service Web Service, included in SPS, that exposes search functionality to remote clients, such as our website. This web service accepts a request in the Microsoft.Search.Query XML format and returns a response in the Microsoft.Search.Response XML format. In order to build a robust solution, the request we submit will use the Microsoft SQL Syntax for full-text Search. One method offered by the Query Service is QueryEx, which we will use as it returns results in the form of a DataSet.
| For more information and documentation on the Microsoft SharePoint Portal Server Query Service Web Service, see MSDN documentation. |
Building a Search Input Control
The first thing we'll do is build a search input control that will submit a search query to a page for processing. This implementation will allow us to add a small search component to all of our templates quickly. Upon submitting a search query, our user control will add the query parameters to the querystring and redirect the request to the results page.
Let's first start by creating a new user control.
- In Visual Studio .NET, right-click the User Controls folder in the Tropical Green project, and select Add | Add Web User Control.
- Name the new control SearchInput.ascx.
- While in Design view, drop controls from the Toolbox onto the Web Form and arrange them as shown below:

- The
LinkButton we created will take the user to the search results page, which we'll add some advanced searching features to later. Double-click our LinkButton. Visual Studio .NET will create an empty event handler for the Click() event. Add a single line of code to this empty event handler to redirect the user to the search results page: private void lnkAdvancedSearch_Click(object sender, System.EventArgs e)
{
Response.Redirect(Request.ApplicationPath + "/SearchResults.aspx");
}
- Next, we need to create an event handler for when a user clicks our Go button. We'll take the keywords entered in the
TextBox and send the search request to the search results page. Double-click the Go button and add the following code to the event handler: private void btnExecuteSearch_Click(object sender, System.EventArgs e)
{
string keywords = this.txtSearchInput.Text;
keywords = HttpUtility.UrlEncode(keywords);
Response.Redirect(Request.ApplicationPath
+ "/SearchResults.aspx?keywords="
+ keywords);
}
Let's see if everything is OK with our new search input control. Save your changes and build the project. If you receive any error messages, retrace your steps and ensure that there are no typos.
Before this control can be used, we need to add it to an existing template. While we'd ideally want to provide the search on all pages on our site (typically by adding it to a global heading control), we'll just add it to the homepage for now.
- Open the \Templates\HomePage.aspx template and drag our new SearchInput.ascx into the top cell, to the right of the logo.
- Switch to HTML view and find the control we just added. It will likely have an opening tag of
uc1:SearchInput. Wrap this control in an HTML DIV and set its alignment to right as shown in the following code: <td width="100%" colspan="2" valign="top" bgcolor="#ffcc00">
<img src="/tropicalgreen/images/Logo.gif">
<div align="right">
<uc1:SearchInput id="SearchInput1" runat="server"></uc1:SearchInput>
</div>
</td>
The HomePage.aspx template should now look similar to the following:

The Advanced Search and Results Page
Once we have our search input control built, we need a page that will execute the search against the SPS Query Service Web Service and display the results. In addition, like all other search result pages, we need to add advanced searching options such as limiting our search to the Tropical Green plant catalog.
Before we can start building the results page, we need to add a web reference to the SPS Query Service Web Service:
- In Visual Studio .NET, right-click the TropicalGreen project and select Add Web Reference.
- Enter the URL of the web service that will retrieve the search results. The URL of the Query Service is http://[portal]/_vti_bin/search.asmx. For this example, we'll use the portal created in Appendix A, http://portal.tropicalgreen.net/_vti_bin/search.asmx. Then click the Go button. You will likely be prompted for a user ID and password since this is part of the SharePoint portal virtual server, which isn't configured for anonymous access.
- Once the web service loads and the available methods are shown in the Add Web Reference dialog, click the Add Reference button to add the web service to our project.
For simplicity, the search results page we will create will not be a CMS template, rather it will be a standard ASP.NET Web Form in the root of the Tropical Green project.
- Right-click the project and select Add | Add Web Form.
- Give the new page the name SearchResults.aspx.
- In Design view, drag and drop the Styles.css file from Solution Explorer onto the form to apply the stylesheet to the page.
- Change the page layout to
FlowLayout. - Drag the following user controls into the designer:
- \UserControls\TopMenu.ascx
- \UserControls\RightMenu.ascx
- Switch to HTML view and modify the
body tag as follows: <body topmargin="0" leftmargin="0">
- Add the following HTML code to the page between the
<form> tags, replacing the two controls we just added: Collapse <form id="Form1" method="post" runat="server">
<table width="100%" border="0" cellspacing="0" cellpadding="0">
<tr>
<td width="100%" colspan="2" valign="top" bgcolor="#ffcc00">
<img src="/tropicalgreen/images/Logo.gif">
</td>
<td vAlign="top" rowSpan="10">
</td>
</tr>
<tr bgColor="#66cc33">
<td colSpan="2">
<uc1:TopMenu id="TopMenu1" runat="server">
</uc1:TopMenu>
</td>
</tr>
<tr>
<td vAlign="top" style="PADDING-RIGHT:30px; PADDING-LEFT:30px;
PADDING-BOTTOM:30px; PADDING-TOP:10px">
<p> </p>
<table cellspacing="0" cellpadding="10" border="1"
bordercolor="#669900">
<tr vAlign="top">
<td>
<b>Tropical Green Search:<b/>
</td>
</tr>
<tr>
<td vAlign="top">
<b>Advanced Search</b>
<p>
<b>Search Results</b>
</td>
</tr>
</table>
</td>
<td class="RightMenuBar" width="20%" valign="top" height="100%"
align="center" rowspan="2" bgcolor="#669900">
<uc1:RightMenu id="RightMenu1" runat="server">
</uc1:RightMenu>
</td>
</tr>
</table>
</form>
We now have the basic layout for our advanced search and search results page, which looks similar to the other templates in our site. Let's add some controls for our advanced search.
- In Design view, drag a
TextBox from the Toolbox and place it under the Advanced Search text. - In Design view, drag a
Button from the Toolbox and place it to the right of the TextBox. - The next thing we need to add is a
DataGrid to contain the results of the search. In Design view, drag a DataGrid control from the Toolbox to just under the Add Search Results Here text. We'll worry about formatting this control later, for now we just need something to show us our data. - Set the properties of the controls we just added, according to the following table:
Our advanced search page should now look like this:

Now it's time to start coding our search logic. First, we need to add an event handler for our advanced search button.
- In Design view, double-click the
btnAdvancedSearch button to create a click event handler. Visual Studio .NET will add an event handler method to the code-behind file. - Add the following code to the
btnAdvancedSearch_Click() event handler: private void btnAdvancedSearch_Click(object sender, System.EventArgs e)
{
string keywords = this.txtAdvancedSearch.Text;
keywords = HttpUtility.UrlEncode(keywords);
Response.Redirect(Request.ApplicationPath
+ "/SearchResults.aspx?keywords="
+ keywords);
}
Next, we need to check the querystring in the Page_Load() event handler to see if any keywords were passed from our SearchInput.ascx control or the txtAdvancedSearch TextBox.
Add the following code to check if there are any keywords supplied, and execute the search if so:
private void Page_Load(object sender, System.EventArgs e)
{
if (Request.QueryString["keywords"] != null
&& Request.QueryString["keywords"] != String.Empty)
{
string keywords = Request.QueryString["keywords"];
DataSet ds = ExecuteSearch(keywords);
this.dgrSearchResults.Visible = true;
this.dgrSearchResults.DataSource = ds;
this.dgrSearchResults.DataBind();
this.txtAdvancedSearch.Text = keywords;
}
else
{
this.dgrSearchResults.Visible = false;
}
}
Now we need to create the method that will execute the search against our SPS content index. This method will:
- Create an instance of the Query Service Web Service we just added to the project.
- Call a method that will build the MSQuery to submit to the Query Service.
- Execute the search.
- Bind the search results to a
DataGrid.
Import the following namespaces in the SearchResults.aspx.cs file:
using System.Security.Principal;

using System.Runtime.InteropServices;

using System.Net;

using System.Text;

using System.Text.RegularExpressions;

using Microsoft.ContentManagement.Publishing;
Add the following method to the SearchResults.aspx.cs file after the Page_Load() event handler. This method will ensure the current thread is running under the original security context regardless of any impersonations that may have been invoked previously:
Collapse
[DllImport("ADVAPI32.DLL")]
public static extern int RevertToSelf();
private DataSet ExecuteSearch(string keywords)
{
keywords = HttpUtility.UrlDecode(keywords);
net.tropicalgreen.portal.QueryService spsQueryService =
new net.tropicalgreen.portal.QueryService();
WindowsIdentity CurrentUser = WindowsIdentity.GetCurrent();
try
{
RevertToSelf();
spsQueryService.Credentials = CredentialCache.DefaultCredentials;
}
catch(System.Exception exception)
{
throw new System.Exception( XE "MCMS search:search" +
" and results page, advanced" exception.Message);
}
finally
{
CurrentUser.Impersonate();
CurrentUser = null;
}
string msQuery = BuildMSQuery(keywords, "Tropical Green website");
return spsQueryService.QueryEx(msQuery);
}
| If you used the SearchSetup.exe program to create your content sources, you should use the content source group "CMSChannels" instead of "Tropical Green website" in the code above. |
Our ExecuteSearch() method calls another method, called BuildMsQuery(), which constructs the MSQuery for sending to the QueryEx() web method. An MSQuery is composed of XML tags that provide instructions to the Query Service, such as the number of results to return in the request, and a Microsoft SQL full-text (MSSQLFT) query. Building the MSSQLFT query and MSQuery is likely to be the most complicated task in implementing the SharePoint search. We'll break it into two tasks: building the actual MSSQLFT query and building the MSQuery XML string. We'll first build the full-text query that our MSQuery will use in the construction of the XML string we'll send to the Query Service.
Building the Microsoft SQL Full-Text Query
SPS's search process uses full-text indexes and queries for fast keyword lookups in order to provide timely responses to the end user. Full-text queries are very similar to regular T-SQL queries in Microsoft SQL Server, but you have additional functions, or predicates, that you can use to give your query more power. One of these predicates that is useful when searching SharePoint indexes is FREETEXT. FREETEXT takes a list of words separated by spaces, determines which words and phrases are significant, and uses that information to build an internal query to search the targeted data in an efficient manner.
First, you need to be aware of the various fields, or properties, available to you in your query. SharePoint provides a list with this information in the Site Settings administration page of your portal.
- Open a new instance of Internet Explorer and navigate to our portal: http://portal.tropicalgreen.net.
- Click on the Site Settings link in the upper right.
- Under the Search Settings and Indexed Content section, click on the Manage properties from crawled documents link.
For each document crawled, the Manage Properties of Crawled Content page lists all properties that SharePoint could potentially contain indexed data on. For our purposes, we're only going to look at the two fields below, as they contain information for our search results page:
DAV:href DAV:getlastmodified

| Notice that some of the fields listed under the urn:schemas.microsoft.com:htmlinfo: metainfo group are the same fields as we added to our template META tags using the SearchMetaTagGenerator user control from the MCMS Connector. |
The other things we'll need are the name of the search scope we created, the name of the content index, and our keywords. Once we have all that information, it makes most sense to construct the MSSQLFT query in its own method for readability. We'll call this method BuildMssqlftQuery() and pass it a string containing our search keywords and the search scope to query. Add the following method at the end of the SearchResults.aspx.cs page:
Collapse
private string BuildMSsqlftQuery(string keywords, string searchScope)
{
StringBuilder mssqlftQuery = new StringBuilder();
ArrayList whereClause = new ArrayList();
#region FILTER: keywords
if (keywords != null && keywords.Length >0)
{
whereClause.Add(string.Format(" {0} {1}",
"WITH (\"DAV:contentclass\":0,"
+ "\"urn:schemas.microsoft.com:fulltextqueryinfo:description\":0,"
+ "\"urn:schemas.microsoft.com:fulltextqueryinfo:sourcegroup\":0,"
+ "\"urn:schemas.microsoft.com:fulltextqueryinfo:cataloggroup\":0,"
+ "\"urn:schemas-microsoft-com:office:office#Keywords\":1.0,"
+ "\"urn:schemas-microsoft-com:office:office#Title\":0.9,"
+ "\"DAV:displayname\":0.9,"
+ "\"urn:schemas-microsoft-com:publishing:Category\":0.8,"
+ "\"urn:schemas-microsoft-com:office:office#Subject\":0.8,"
+ "\"urn:schemas-microsoft-com:office:office#Author\":0.7,"
+ "\"urn:schemas-microsoft-com:office:office#Description\":0.5,"
+ "\"urn:schemas-microsoft-com:sharepoint:portal:profile:"
+ "PreferredName\":0.2,contents:0.1,*:0.05) "
+ "AS #WeightedProps",
"FREETEXT(#WeightedProps, '" +keywords.ToString().Trim() +"')")
);
}
#endregion
#region FILTER: sps source group
whereClause.Add(string.Format(" {0}",
"(\"urn:schemas.microsoft.com:fulltextqueryinfo:Sourcegroup\" = '"
+ searchScope +"')"));
#endregion
mssqlftQuery.Append("SELECT ");
mssqlftQuery.Append("\"DAV:href\",");
mssqlftQuery.Append("\"DAV:getlastmodified\"");
mssqlftQuery.Append(" FROM Non_Portal_Content..SCOPE()");
mssqlftQuery.Append(" WHERE ");
int i=0;
foreach (string s in whereClause)
{
if (i > 0)
mssqlftQuery.Append(" AND ");
mssqlftQuery.Append(s);
i++;
}
return mssqlftQuery.ToString();
}
Notice we added a calculated field, which we used to apply certain weight to some fields. This is how SharePoint actually executes its own search. You could configure the property weighting to give more emphasis to specific properties in your query. For example, you may want to give more weight to the title of the page, or to the keywords stored in the HTML META tags, than to the contents of the page.
Now that we have this method, let's move on to creating the MSQuery string. We'll use this method in the construction of our MSQuery string.
Building the MSQuery XML String
We know that the SPS Query Service Web Service accepts a single parameter: an MSQuery string. This string is actually an XML document, but it's passed to the Query Service as a string. The XML tags in this string tell the Query Service the type of response it supports, how many records to return in the result, and the result index to start the search results at. The <StartAt></StartAt> element is what you can use in paging your result set. We won't be incorporating paging into our site as it is small, but you can see how easy it would be to do so.
Let's get started, by creating our BuildMsQuery() method that returns a complete MSQuery XML string containing all the information necessary to execute a query against a SharePoint index. Add the following method at the end of the SearchResults.aspx.cs page:
Collapse
public string BuildMSQuery(string keywords, string searchScope)
{
StringBuilder msQuery = new StringBuilder();
msQuery.Append(""
+ "
+ "Revision=\"1000\">"
+ ""
+ ""
+ "urn:Microsoft.Search.Response.Document.Document"
+ "");
msQuery.Append(""
+ "\""en-US\" type=\"MSSQLFT\">"
+ "");
msQuery.Append("120"
+ "");
return msQuery.ToString();
}
| The two nodes of an MSQuery after the opening QueryPacket node (Query, and SupportedFormats) should not be modified. The Context node contains the actual search query, which you can change to suit your requirements. The last node, Range, contains directives used to tell the SPS Query Service Web Service how many results to return and at what index to start the result set. For example, if you displayed 20 results per page and you wanted to show the third page of results, you'd set the StartAt node to 41 and leave the Count node at 20. |
We now have a complete MSQuery string with an included full-text query.
Let's see if our search will now work. Build the Tropical Green project and navigate to http://www.tropicalgreen.net/. Enter ficus in the search box and click Go. You should see results similar to those in the following image (we'll worry about making it more presentable in a moment):

Every good search engine provides more than just keyword search. Some sites filter by topic and others by product. In our case, we could filter all our results to only the plant catalog, excluding the rest of the site. You would not be able to do this in a user-friendly manner using the controls provided by the MCMS Connector. While a knowledgeable guest could realize they could put in part of the CMS path in one of the advanced search options, it's not straightforward to the typical guest of the site. This is where you can really start to leverage your custom search components.
Let's add a filter to search just our plant catalog:
- Open SearchResults.aspx in Design view, and drag a
CheckBox just below our advanced search textbox and assign it the following properties: - Open the code-behind file for the SearchResults.aspx page and add the following highlighted code to the
btnAdvancedSearch_Click() event handler: private void btnAdvancedSearch_Click(object sender, System.EventArgs e)
{
string keywords = this.txtAdvancedSearch.Text;
keywords = HttpUtility.UrlEncode(keywords);
string filter = string.Empty;
if (this.chkFilterPlantCatalog.Checked)
{
filter = "&filterPlantCatalog=1";
}
Response.Redirect(Request.ApplicationPath
+ "/SearchResults.aspx?keywords=" + keywords + filter);
}
- Add the highlighted code below to the
BuildMSsqlftQuery() method: private string BuildMSsqlftQuery(string keywords, string searchScope)
{
System.Text.StringBuilder mssqlftQuery =
new System.Text.StringBuilder();
ArrayList whereClause = new ArrayList();
#region FILTER: keywords
#endregion
#region FILTER: plant catalog
if ( Request.QueryString["filterPlantCatalog"] != null
&& Request.QueryString["filterPlantCatalog"].ToString() == "1" )
{
whereClause.Add("(\"urn:schemas.microsoft.com:htmlinfo:metainfo:PATH"
+ "\" LIKE '/channels/tropicalgreen/plantcatalog/%')");
}
#endregion
| Notice how we are using the urn:schemas.microsoft.com:htmlinfo:metainfo:PATH index property, which is mapped to the CMS Channel Path thanks to the SearchPropertyCollection.xml file provided with the MCMS Connector. |
- Let's see how the filter works. Save your changes and build the Tropical Green project. Once the build is complete, open your browser and navigate to http://www.tropicalgreen.net/TropicalGreen/SearchResults.aspx. Enter ficus in the textbox, check the Only Search Plant Catalog
CheckBox, and click the Go button: 
Fantastic! We now only see records inside our Tropical Green plant catalog! This gives a good idea of what filtering brings to the table. We could filter by so many things, such as displaying only postings that have been updated in the last month or week. The possibilities are almost endless.
Let's see if we can't clean up those search results by getting rid of the DataGrid and replacing it with a Repeater. At the same time, we'll add filtering of the search results so users will only see postings that they have rights to access.
Although we listed numerous SharePoint index properties in our full text query, we will only use the DAV:href property when analyzing the results in our main results page to obtain a reference to the specified MCMS channel or posting to determine if the user has rights to browse the resource and also to determine and return the actual posting's name and description.
- Open the SearchResults.aspx page in Design view. Delete the
DataGrid. - Drag a
Repeater object onto the page where the DataGrid was. Assign the Repeater an ID of rptSearchResults. - While in Design view, select our new
Repeater and open the Properties window. At the top of the window, click the Events button to show all possible events we can use. Double-click the box to the right of ItemDataBound to create an empty event handler that will fire every time an item is bound to the Repeater. - Switch back to HTML view for the SearchResults.aspx and scroll to our new
Repeater. - Add the following highlighted tags into the
ItemTemplate of our Repeater: <asp:repeater id="rptSearchResults" runat="server">
<ItemTemplate>
<asp:Placeholder ID="phdSearchResult" Runat="server" visible="false">
<p>
<b><asp:HyperLink ID="hlkResultTitle" Runat="server" /></b>
<br>
<asp:Literal ID="litResultDescription" Runat="server" />
</p>
</asp:Placeholder>
</ItemTemplate>
</asp:repeater>
| Notice the ASP.NET Placeholder we've added surrounding the search result. We'll use this to show and hide results that the user does or does not have permission to view. |
Now that we have a Repeater filled with some placeholders for the content, we need to modify our data binding, which is still using a DataGrid.
- Open the code-behind file for SearchResults.aspx, find the
Page_Load() event handler, and modify the code to bind the only DataTable in the DataSet to the Repeater as shown below: private void Page_Load(object sender, System.EventArgs e)
{
if (Request.QueryString["keywords"] != null
&& Request.QueryString["keywords"].Length >0)
{
string keywords = Request.QueryString["keywords"];
DataSet ds = ExecuteSearch(keywords);
this.rptSearchResults.Visible = true;
this.rptSearchResults.DataSource = ds.Tables[0].Rows;
this.rptSearchResults.DataBind();
}
else
{
this.rptSearchResults.Visible = false;
}
}
- Before we implement the
ItemDataBound event, we need to create a method that will try to obtain the MCMS ChannellItem reference of the URL returned in the results. Add the following method after the Page_Load() event handler we just modified: Collapse private HierarchyItem GetResult(string url)
{
try
{
if (url.IndexOf("RDONLYRES") >= 0)
{
string guidRegEx = "[a-fA-F0-9]{8}-[a-fA-F0-9]{4}-[a-fA-F0-9]{4}-"
+ "[a-fA-F0-9]{4}-[a-fA-F0-9]{12}";
Regex regex = new Regex(guidRegEx);
Match m = regex.Match(url);
if (m.Success)
{
return CmsHttpContext.Current.Searches.GetByGuid("{"+m.Value+"}");
}
}
else
{
return CmsHttpContext.Current.Searches.GetByUrl(url);
}
return null;
}
catch
{
return null;
}
}
- Now, find the
rptSearchResults_ItemDataBound() event handler. We need to trap the event when it's binding a data item to the ItemTemplate or AlternateItemTemplate in the Repeater. Then, we'll get a reference to the data item being bound to the template, in our case a DataRow, and get references to the ASP.NET objects we added to the template. Finally, we'll use the data in the DataRow to populate the properties of our controls. Here's what our completed ItemDataBound() event handler will look like: Collapse private void rptSearchResults_ItemDataBound(object sender,
System.Web.UI.WebControls.RepeaterItemEventArgs e)
{
if ( (e.Item.ItemType == ListItemType.AlternatingItem)
|| (e.Item.ItemType == ListItemType.Item) )
{
DataRow row = e.Item.DataItem as DataRow;
HierarchyItem hi = GetResult(row[0].ToString());
PlaceHolder resultContainer = e.Item.FindControl("phdSearchResult")
as PlaceHolder;
HyperLink resultTitle = e.Item.FindControl("hlkResultTitle")
as HyperLink;
Literal resultDesc = e.Item.FindControl("litResultDescription")
as Literal;
if (hi != null)
{
resultContainer.Visible = true;
resultDesc.Text = hi.Description;
if (hi is ChannelItem)
{
resultTitle.Text = (hi as ChannelItem).DisplayName;
resultTitle.NavigateUrl = (hi as ChannelItem).Url;
}
else
{
if (hi is Resource)
resultTitle.NavigateUrl = (hi as Resource).Url;
resultTitle.Text = hi.Name;
}
}
}
}
The final result looks something like this:

You'll see that the description field may not have exactly what we're looking for, but this technique lets us customize the search result list to our hearts' content. You could pull the description of the posting straight out of the indexed values, provided you exposed the page description using the SearchPropertyCollection.xml file. Or you could even have an HtmlPlaceholder called "Search Description" in all your templates that content owners could use to enter a description to show when the posting appears in search results.
Summary
In this chapter, we discussed a few of the options available to MCMS developers for adding search functionality to their sites. We proceeded to take an in-depth look at the searching features built into SharePoint Portal Server and how they can be leveraged as a back-end search workhorse for an MCMS site. Before we could start adding the search functionality, we had to make a few changes to our site and templates, as well as build an index using SharePoint to crawl our site.
Once our site was configured for index crawls and SharePoint was configured to crawl our site and build an index, we explored in detail two options for adding search functionality to the Tropical Green site using the SharePoint crawler:
- First we implemented search using the MCMS Connector for SharePoint Technologies, an out-of-the-box solution.
- Then, we built our own solution using the SharePoint Query Service Web Service and custom full text T-SQL queries to provide search filters and customized results.